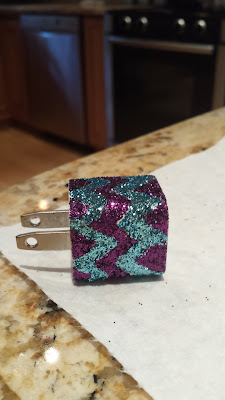
Chevron glitter chargers are not for the faint of DIY-heart. Luckily though, if you could handle the first few steps, the last half of them will be a breeze. What'll you'll need to complete the project is a paper plate, matte mod podge, a small paint brush, glitter, and either nail polish in a color similar to the glitter used or hairspray. Read on to see how it all came together!
I began by dipping a small paint brush into a tiny bit of mod podge on a paper plate. I then thinly coated all of the white space where I'd be putting the new glitter.
To avoid wastefully dumping glitter, I put a small pile on the paper plate and used a small flat paintbrush as a scooper to more precisely place the glitter where I wanted it.
I continuously tapped away the excess glitter until its completion. After I allowed the glitter and mod podge to dry, it was time to cement it all in place to prevent any fallout. To do this I painted glitter nail polish over the glitter in the corresponding color on both the charger and the USB cord. Clear polish works great too, I just happened to have the perfect colored topcoats!
The polish really made the lines much cleaner looking, as it filled in ridges and remaining gaps. A fine mist of strong hair spray also helped hold all of that beautiful glitter in place.
Thanks for stopping by and checking out our little project. If you enjoyed this DIY, make sure to follow us for more girlie things like it!
xoxo
~JessTour


No comments
Post a Comment